You can create “zaps” that contain a trigger and an action for a task that you want to perform repeatedly. Zapier regularly checks your trigger for new data and automatically performs the action for you.
Using Zapier you can integrate over 700 apps into Mattermost, including Email, GitHub, Jira, Wufoo, Salesforce, Gmail, and many more.
Zapier is authorized using OAuth2.0. The setup guide requires that a System Admin register the Zapier app on their Mattermost server and can then optionally allow any users with a Zapier account to create integrations.
The first time you set up Zapier on your Mattermost instance you’ll be required to enable an OAuth 2.0 application which can be used by everyone on your server. Your System Admin must execute these steps.
To learn more about OAuth 2.0 applications, including what permissions they have access to, see the OAuth 2.0 documentation.
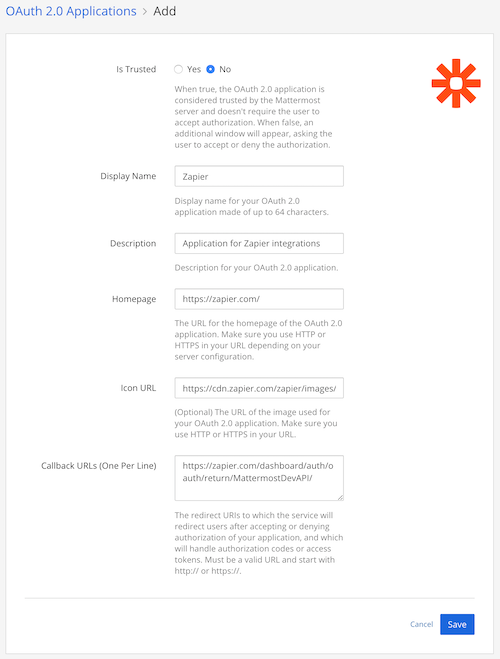
ZapierApplication for Zapier integrationshttps://zapier.com/https://cdn.zapier.com/zapier/images/logos/zapier-logomark.pnghttps://zapier.com/dashboard/auth/oauth/return/MattermostDevAPI/You’ll be provided with a Client ID and Client Secret. Save these values, or share them with your team to connect Zapier in the steps below.
Sign up for a free Zapier account or log in if you already have one.
On your Zapier dashboard select Make a Zap!.
Trigger App: Events in this app will trigger new messages in Mattermost.
Filtering: (Optional) Exclude certain events from triggering new messages. Learn more about using Zapier custom filtering.
Mattermost Action: Connect your Mattermost Account and then specify posting details.
Mattermost URL: This is the URL you use to access your Mattermost site. Don’t include a slash at the end of the URL and don’t append a team to the end of the server URL. For example, https://community.mattermost.com/core is the entire URL to the Contributors team on our community server. The Mattermost URL entered here would be https://community.mattermost.com.
Client ID/Secret: If Zapier has been enabled as an OAuth application as per the steps above, then these values can be found by navigating to one of your Mattermost teams, then Product menu > Integrations > OAuth 2.0 Applications. Select Show Secret next to the Zapier app, then obtain the Client ID and Client Secret.
Log in to Mattermost: After completing the above fields you will be prompted to log in to your Mattermost account if you’re not logged in already. If you’re having trouble connecting then please read our troubleshooting guide.
You’ll then be prompted to allow Zapier to access your Mattermost account. Select Allow.
Message Post Details: Specify the formatting of the messages and the team/channel where messages will be posted.
Team: Choose the team where new messages will post. The dropdown should contain all teams you have access to on Mattermost.
Channel: Choose the channel where new messages will post. The dropdown contains all channels that you belong to. Zapier cannot post into Direct Message channels.
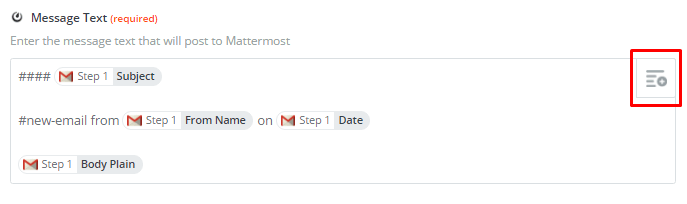
Message Text: Enter the message text that will post to Mattermost. This text can be formatted using Markdown and include the dynamic fields offered by your selected trigger app. Read our message formatting tips below.
Username: This is the username that Zapier will post as. Zapier integrations will always appear with a BOT tag next to the username. In order for bots to override the username of the authorized user, your System Admin must set Enable integrations to override usernames to True.
Icon URL: This is the profile picture of the bot that Zapier will post as. In order for bots to override the profile picture of the authorized user, your System Admin must set Enable integrations to override profile picture icons to True.
Test the Zap: You may want to test your zap formatting in a Private Channel before posting in a channel that is visible to your entire team.
Here are some useful tips we recommend to get the most out of Zapier integration:
The Mattermost team has over 50 zaps integrated on our Community Contributors tem used for internal communication and interacting with contributors. The Community Heartbeat channel integrates all our community services in one accessible location. These zaps are formatted in two ways depending on the service:
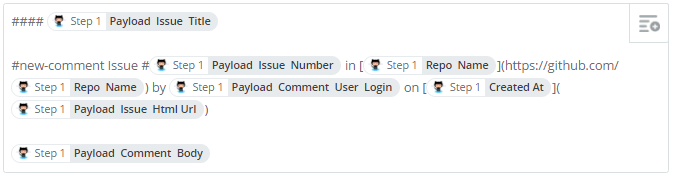
GitHub Issues and Comments, UserVoice Suggestions and Comments, GitLab MM Issues, GitLab Omnibus MM Issues
#### [Title of issue]

#[searchable-hashtag] in [external service](link to service) by [author](link to author profile) on [time-stamp](link to specific issue or comment)

[Body of issue or comment]
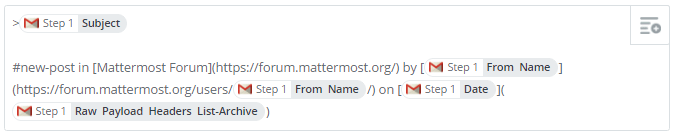
Forum Posts, Jira Comments, Hacker News Mentions, Tweets
> [forum post, media mention, or tweet]

#[searchable-hashtag] in [external service](link to service) by [author](link to author profile) on [time-stamp](link to specific forum post, media mention or tweet)
Possible solutions to common issues encountered during setup.
"Token named access_token was not found in oauth response!"
a. Possible Solution: Try removing any trailing /’s on the end of your Mattermost URL.
https://community.mattermost.comhttps://community.mattermost.com/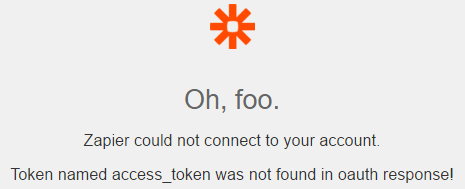
"[Server URL] returned (404)"
a. Possible Solution: The Mattermost URL cannot have a team appended to the end of the server URL.
https://community.mattermost.comhttps://community.mattermost.com/core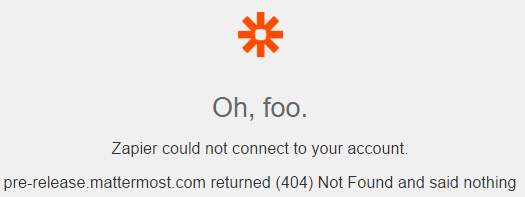
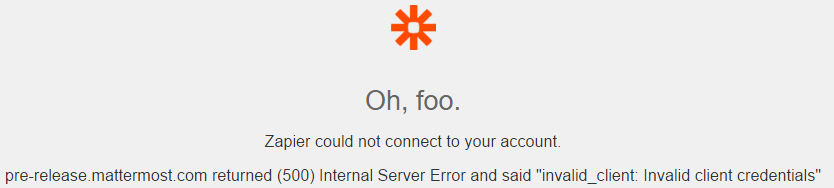
"[Server URL] returned (500) Internal Server Error"
a. Possible Solution: The Client Secret might be incorrect. Verify this value by selecting Integrations > OAuth 2.0 Applications from the Product menu, or check with your System Admin.
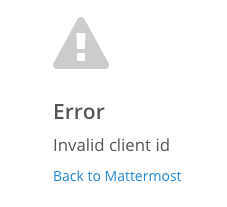
"Error Invalid client id"
a. Possible Solution: The Client ID and/or Client Secret might have trailing spaces in them when copied and pasted into the form. Verify there are no trailing spaces in the Client ID and Client Secret fields then try again.
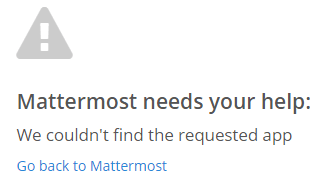
"Mattermost needs your help: We couldn't find the requested app"
a. Possible Solution: The Client ID might be incorrect. Verify this value by selecting Integrations > OAuth 2.0 Applications from the Product menu, or check with your System Admin.
If you’d like to deauthorize Zapier so it can no longer post through your connected account, select your avatar, then select Profile > Security > OAuth 2.0 Applications, then select Deauthorize on the Zapier app.