Table of contents
brew cask install viscosity
Go to the VPN server and select Sign in with OneLogin.
Then connect with your OneLogin username and password and when prompt put the OTP (One Time Password).
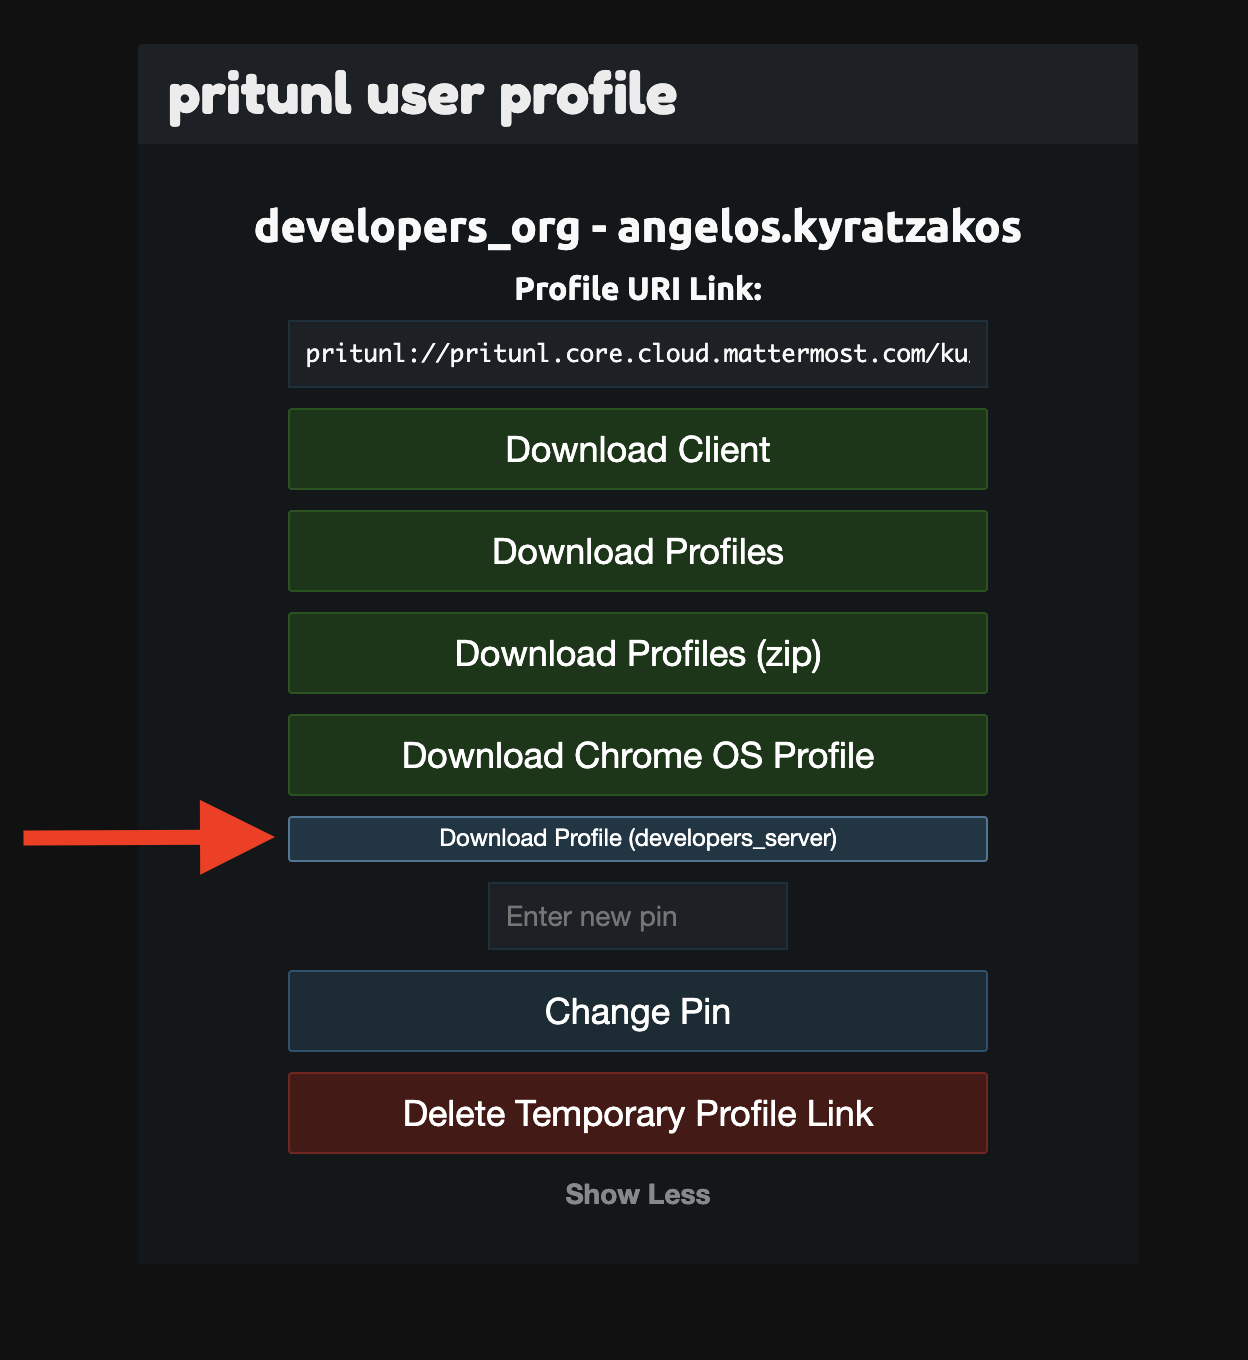
Select Show More and hit Download Profile
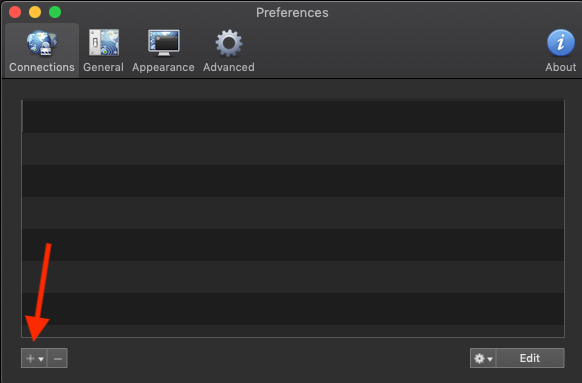
Open the Viscosity application or your preferred VPN client and go to settings/preferences.
Click + to import the profile you downloaded from the VPN server on the step 1
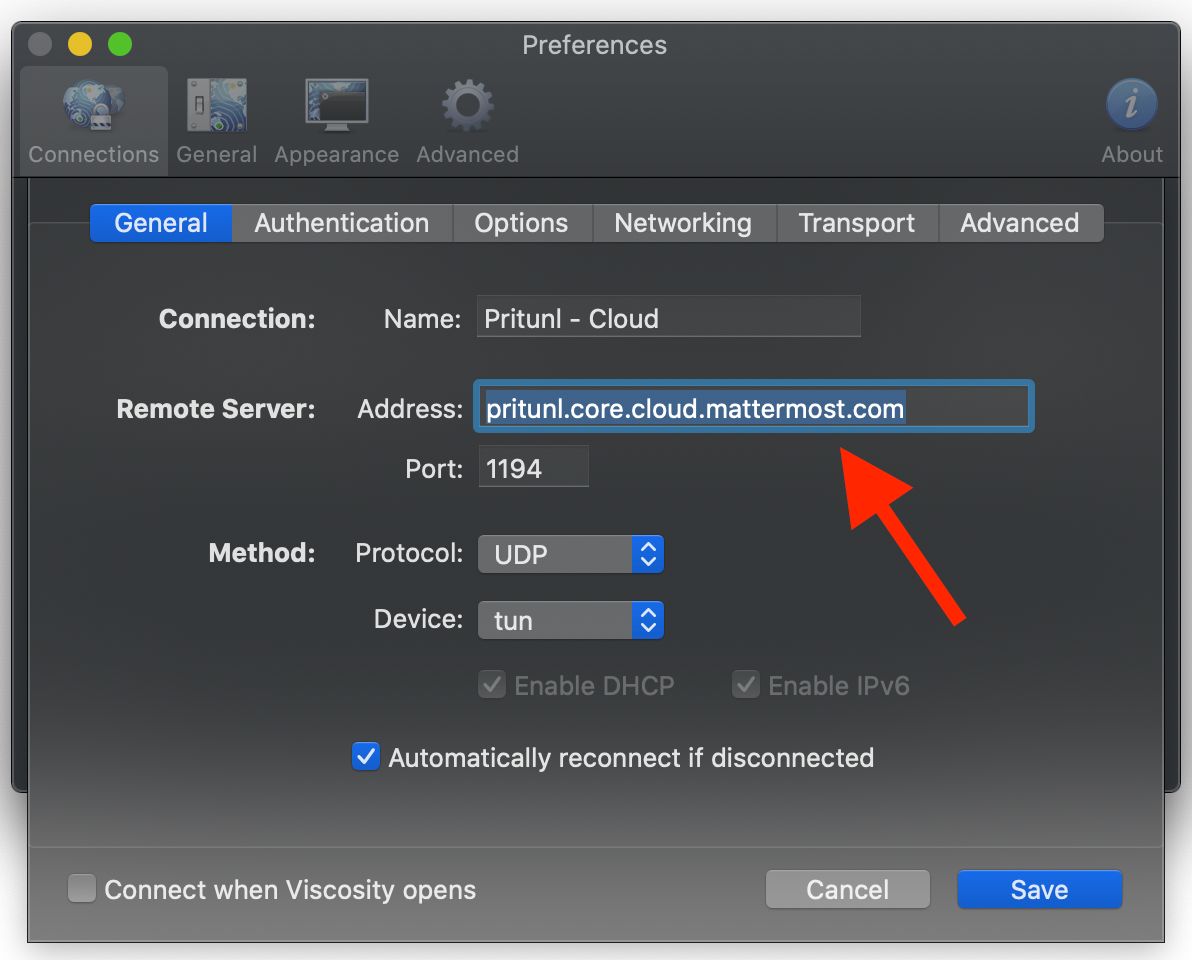
After your profile is imported, select to edit the entry,
On the General tab update the Address of the Remote Server to be: pritunl.core.cloud.mattermost.com as shown below:
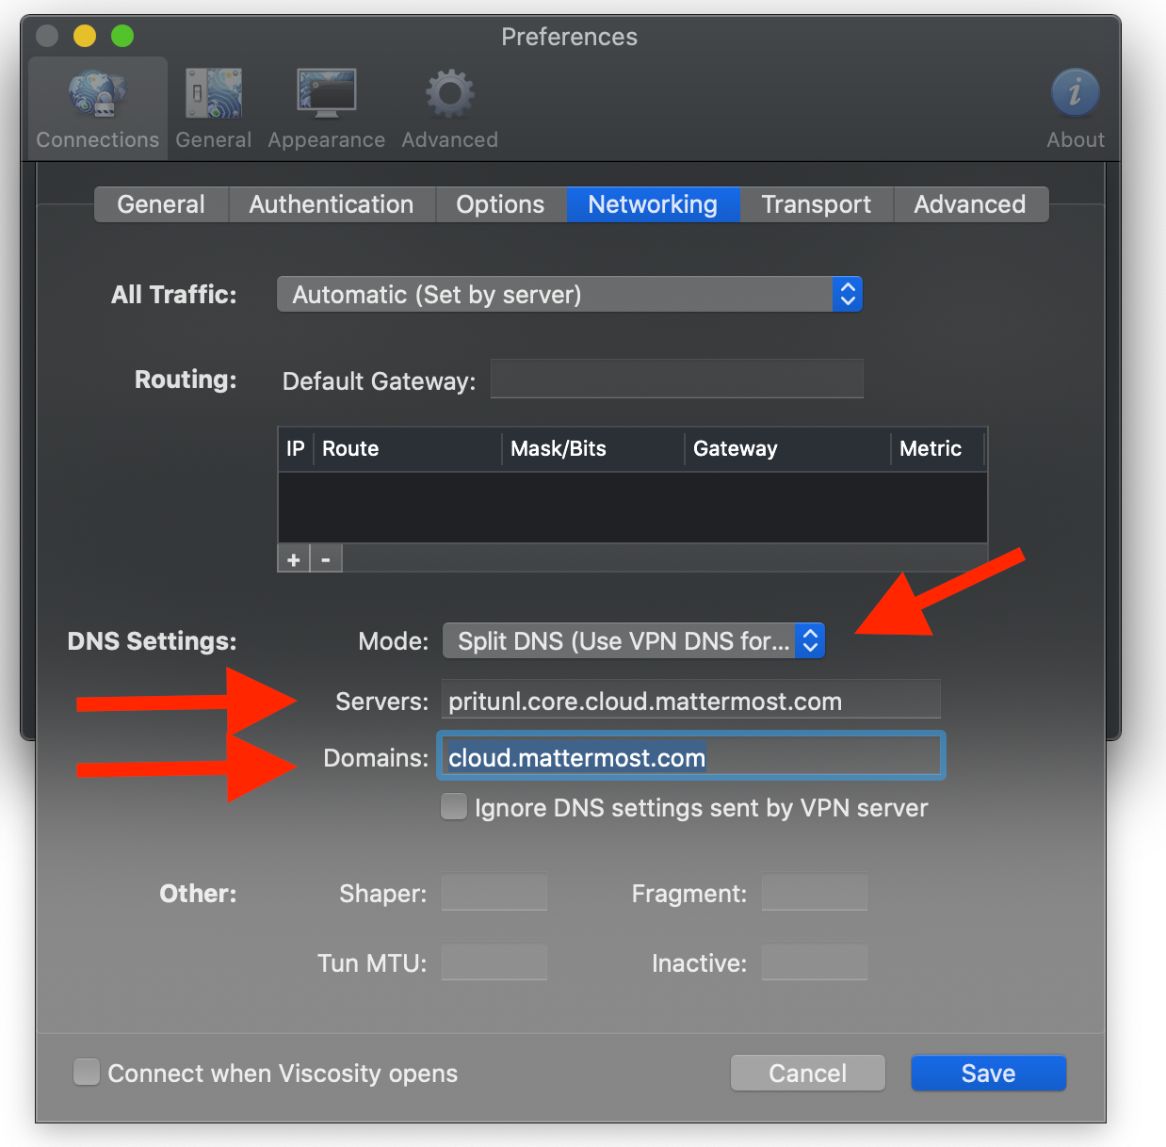
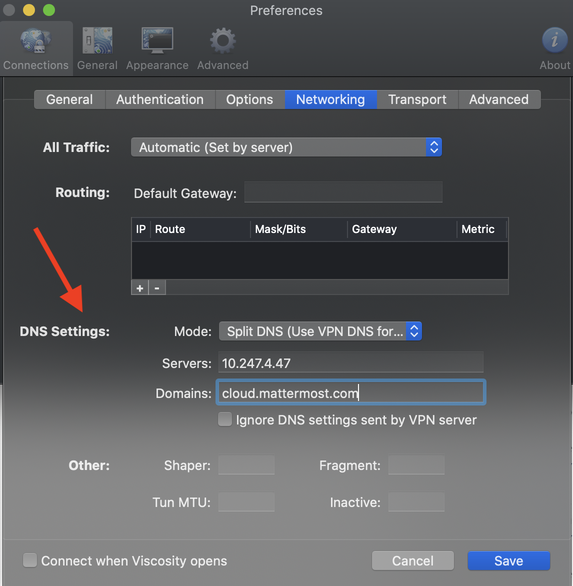
Go to Networking tab and update the DNS settings.
Full DNS.Servers put: pritunl.core.cloud.mattermost.com which is VPN’s server IP.Domains put: cloud.mattermost.com, this will split traffic for those domains
Add, if it is not there, in your /etc/resolv.conf:
nameserver 10.247.0.2
For MacOS, first check what CIDR was in the resolv.conf with cat /etc/resolv.conf and then you will need to run
sudo networksetup -setdnsservers Wi-Fi 10.247.0.2 8.8.8.8 X.X.X.X with your extra CIDRs that they were already in
your resolv.conf. Also check if you are connected with Wi-Fi, or to find your available devices by running
networksetup -listallnetworkservices and to replace it in the above command.
After following these steps you should be able to connect to VPN and then to resolve private DNS entries.
Go to the VPN server and select Sign in with OneLogin Then connect with your OneLogin username and password and when prompt put the OTP (One Time Password).
Select Download Client which will redirect you to download the Pritunl Client.
Select your OS, download and install the appropriate client.
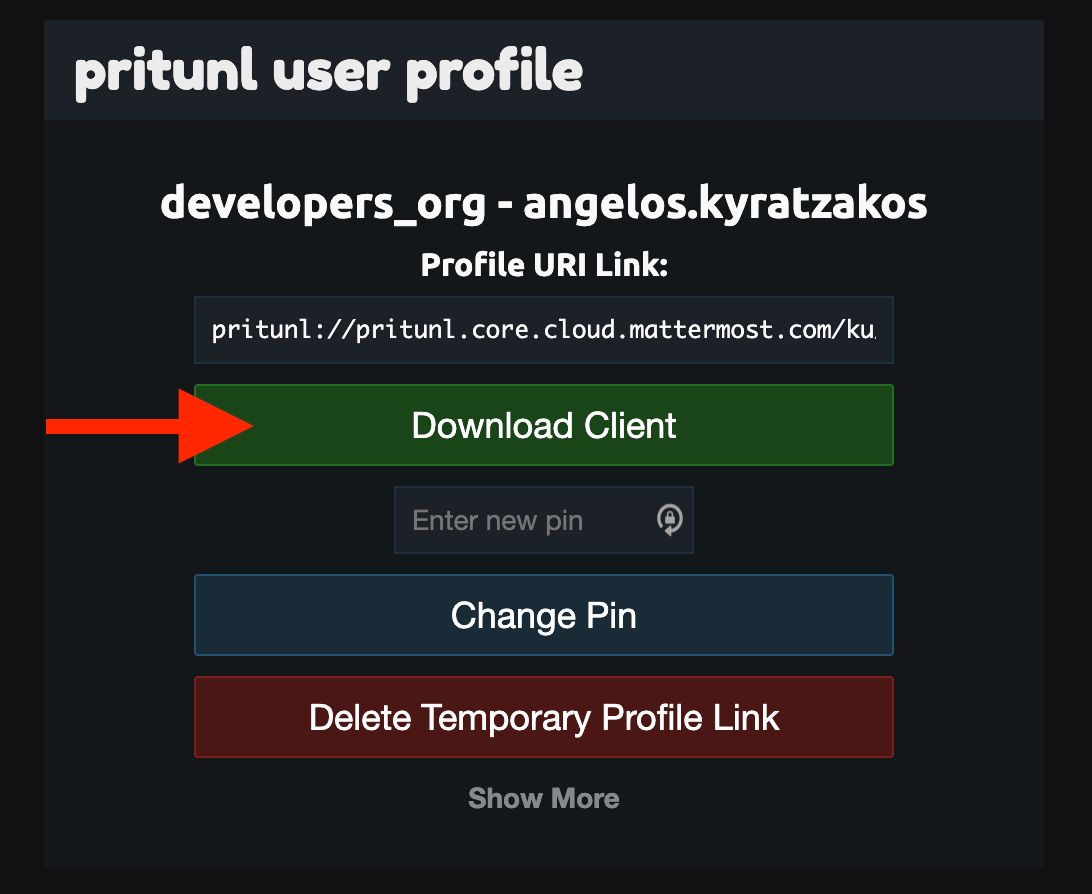
Go back to browser and copy the Profile URI link

Open the Pritunl client and paste the Profile URI link from previous step
into Import Profile URI

Click the burger button on the newly imported profile and select Edit Config

On the config change the line that says:
remote X.XXX.XXX.XX 1194 udp to be:
remote pritunl.core.cloud.mattermost.com 1194 udp
Add, if it is not there, in your /etc/resolv.conf:
nameserver 10.247.0.2
For MacOS, first check what CIDR was in the resolv.conf with cat /etc/resolv.conf and then you will need to run
sudo networksetup -setdnsservers Wi-Fi 10.247.0.2 8.8.8.8 X.X.X.X with your extra CIDRs that they were already in
your resolv.conf. Also check if you are connected with Wi-Fi, or to find your available devices by running
networksetup -listallnetworkservices and to replace it in the above command.
After following these steps you should be able to connect to VPN and resolve private DNS entries.
Go to the VPN server and select Sign in with OneLogin.
Connect with your OneLogin username and password and when prompted input the OTP (One Time Password).
Click Download Profiles and save the .tar file to your filesystem.
Extract the .tar file (tar xf yourusername.tar) and note the location of the .ovpn file.
Open the Gnome Settings manager and navigate to Network > VPN. Click the + to create a new VPN connection.
Choose Import from file….
Select the .ovpn file downloaded earlier through the file picker.
Open the IPv4 tab and select Use this connection only for resources on its network.
Open the IPv6 tab and select Use this connection only for resources on its network.
If desired, rename the VPN to something friendlier in Identity > Name.
Choose Add to save the configuration.
From now on, enable the VPN through the taskbar picker in the upper right corner of Gnome.
Login to the VPN server using your mattermost email and OneLogin password. Please select connect instead of login on the drop down menu.
Please refresh the page if it says: Please click here to continue to download OpenVPN Connect. You will be automatically connected after the installation has finished.
Download the user-locked profile.

Install a VPN client that supports DNS settings such as Visocity.
brew cask install viscosity
Open the Viscosity application or your preferred VPN client and go to settings/preferences.
Click + to import the profile you downloaded from the VPN server on the step 1
After your profile is imported, select to edit the entry, go to Networking tab and update the DNS settings.
Split DNS.10.247.4.47 which is VPN’s server IP.cloud.mattermost.com, this will split traffic for those domains
After following these steps you should be able to connect to VPN and then to resolve private DNS entries.