On Monday, March 16, 2020, I had the privilege to (virtually) join Shota Gvinepadze and his students at the Free University of Tbilisi and speak about “Advanced Git @ Mattermost” for a portion of their class time.
The following are my speaking notes from the session, slightly modified from the original slides for this format. Keep in mind that the command line examples are illustrative of my workflow, and not meant to be run in isolation.
Today’s session on open source will focus on understanding Git better. I’ve interacted with a lot of people who are “scared of Git.” They know the basics – pulling, committing, pushing – but anytime something goes wrong, they’re stuck. Or they know about some of the advanced Git commands, but worry every time they have to do one.
Over the next hour, my hope is to demystify some of these advanced commands, and show you how I use these tools to solve day-to-day problems while working at Mattermost.
What do I mean by advanced Git? I’m thinking of four different operations in particular:
git revertgit cherry-pickgit rebasegit reflogKeep in mind that I can’t hope to exhaust the depths of how these commands are implemented within Git. My goal is to share with you a working knowledge of these commands.
Let’s start with git revert. This is one of many different ways to “undo” something in Git. What motivates undoing something?
Just over two years ago, I began working at Mattermost. As part of a team investigating performance improvements, I had been asked to dig into a slow SQL query to determine if there was an opportunity for improvement. After several days of analysis and testing, I found a major issue and a very promising improvement: a query that took upwards of 3 seconds in a large dataset could be modified to run in just a few milliseconds instead. I implemented the improvement, we tested it in our own environment, and ultimately shipped it in Mattermost v4.9.
Just over a month later, one of larger customers upgraded to v4.9 and found their system grinding to a halt. We hopped on an emergency call to glean some information, and everything pointed to my changes making things much worse instead of much better. You can read the details of my second investigation into what went wrong, but in the end, we decided to revert my changes and ship a patch release.
When I undid these changes, I wanted to bring the code back to exactly the way it was before my changes. We already knew how that code behaved for this customer, and the goal was to restore stability by using the old code instead. I could, of course, make the changes manually: finding the old code and copying it over top of the new code. But one of Git’s built-in commands is an operation to do this automatically. Let’s see it in action!
# Checkout the mattermost-server repository
git clone https://github.com/mattermost/mattermost.git
cd mattermost-server

# Go back in time to the v4.9.0 tag
git checkout -b test-git-revert
git reset --hard v4.9.0

# Find the offending commit
git log --author Jesse
git show 4b675b347b5241def7807fab5e01ce9b98531815
git revert --no-commit 4b675b347b5241def7807fab5e01ce9b98531815

# Examine and commit the differences
git diff --cached
git commit
Just like that, Git has created a commit to undo my changes. What exactly did it do under the cover? The practical thing to understand is that Git created a new commit that undid the changes in the existing commit. It did not go back in time and change what already happened. Instead, it moved my commit history forward by introducing a new commit that effectively restored some past state.
This has some practical consequences:
Of course, if you’ve ever done this before, you know that I’ve kind of cheated today: my revert was clean, in that there were no merge conflicts. Sometimes, especially if some time has passed, other changes might have touched the same lines, and the revert will require resolving those changes. Hold that thought, though, since I’ll work through an example of resolving merge conflicts with the next command. Remember, reverts are just new commits!
Next up: cherry picking! The general idea of cherry picking – not specific to Git – is to pick and choose just what you want. You can imagine yourself standing in front of an actual cherry tree, and saying, “I’ll take that one, and that one, and that one” and ignoring the rest.
In git, the idea is similar. Given one or more commits – anywhere in the tree – apply those same changes to my current branch. Why would you want to do that?
At Mattermost, master is our development branch. Every two months we release a new version of Mattermost that branches off master. Our release team begins to qualify this release, inevitably finding issues. We first fix the bugs in master, and then cherry-pick those changes back to the release branch. Of course, there are lots of different ways of using Git to handle releases, but this is the strategy we use at Mattermost.
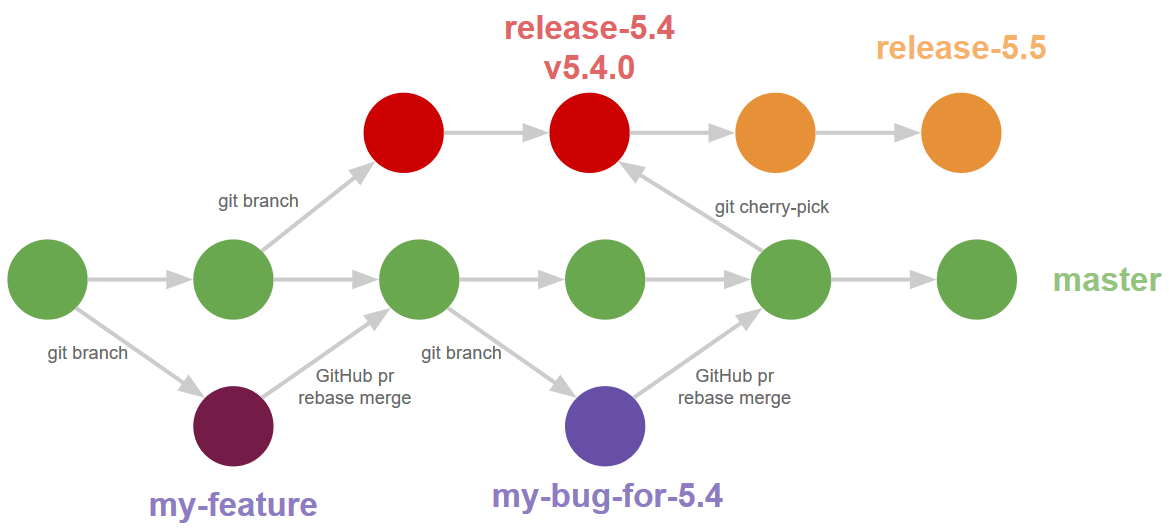
Let’s look at the most recent such feature release: v5.20.
# Checkout the mattermost-server repository (if not already done)
git clone https://github.com/mattermost/mattermost.git
cd mattermost-server

# Examine the combined history of release-5.20 and master
git log --graph --oneline origin/release-5.20 master
Observe that master has advanced in the weeks since we released v5.20. When we first released v5.20.0, a community member tried installing it and promptly reported that his server was crashing! A bit of debugging on a Saturday, and I realized that we had introduced a regression into a code path we didn’t often use ourselves. I filed MM-21619 and got to work on the fix. Let’s find it in the master branch.
# Find the commit for MM-22619 in master and release 5.20
git log --grep MM-22619 master
Now let’s try to repeat that cherry-pick from the original v5.20.0 tag.
git checkout -b test-git-cherrypick v5.20.0
git cherry-pick 9a51c73f6428b70e31fc8c35de770b91270e6bba
Oh no, merge conflicts! Two of the files were cherry-picked without issue, but some other changes had snuck into master before my fix. Whenever a merge conflict occurs, Git annotates the file with conflict markers. Let’s open up the file and take a look. There are three blocks: HEAD (what’s in my current branch), parent (the common ancestor of the cherry-pick and this branch), and the cherry-pick itself.
<<<<<<< HEAD
	th := Setup(t).InitBasic()
||||||| parent of 9a51c73f6... MM-22619: check for nil plugins environment (#13901)
	th := Setup(t)
=======
	th := SetupWithCustomConfig(t, func(config *model.Config) {
		*config.PluginSettings.Enable = false
	})
>>>>>>> 9a51c73f6... MM-22619: check for nil plugins environment (#13901)
	defer th.TearDown()
I have a mergetool configured with Git to show this same information using a three-way merge inside Vim:
git mergetool
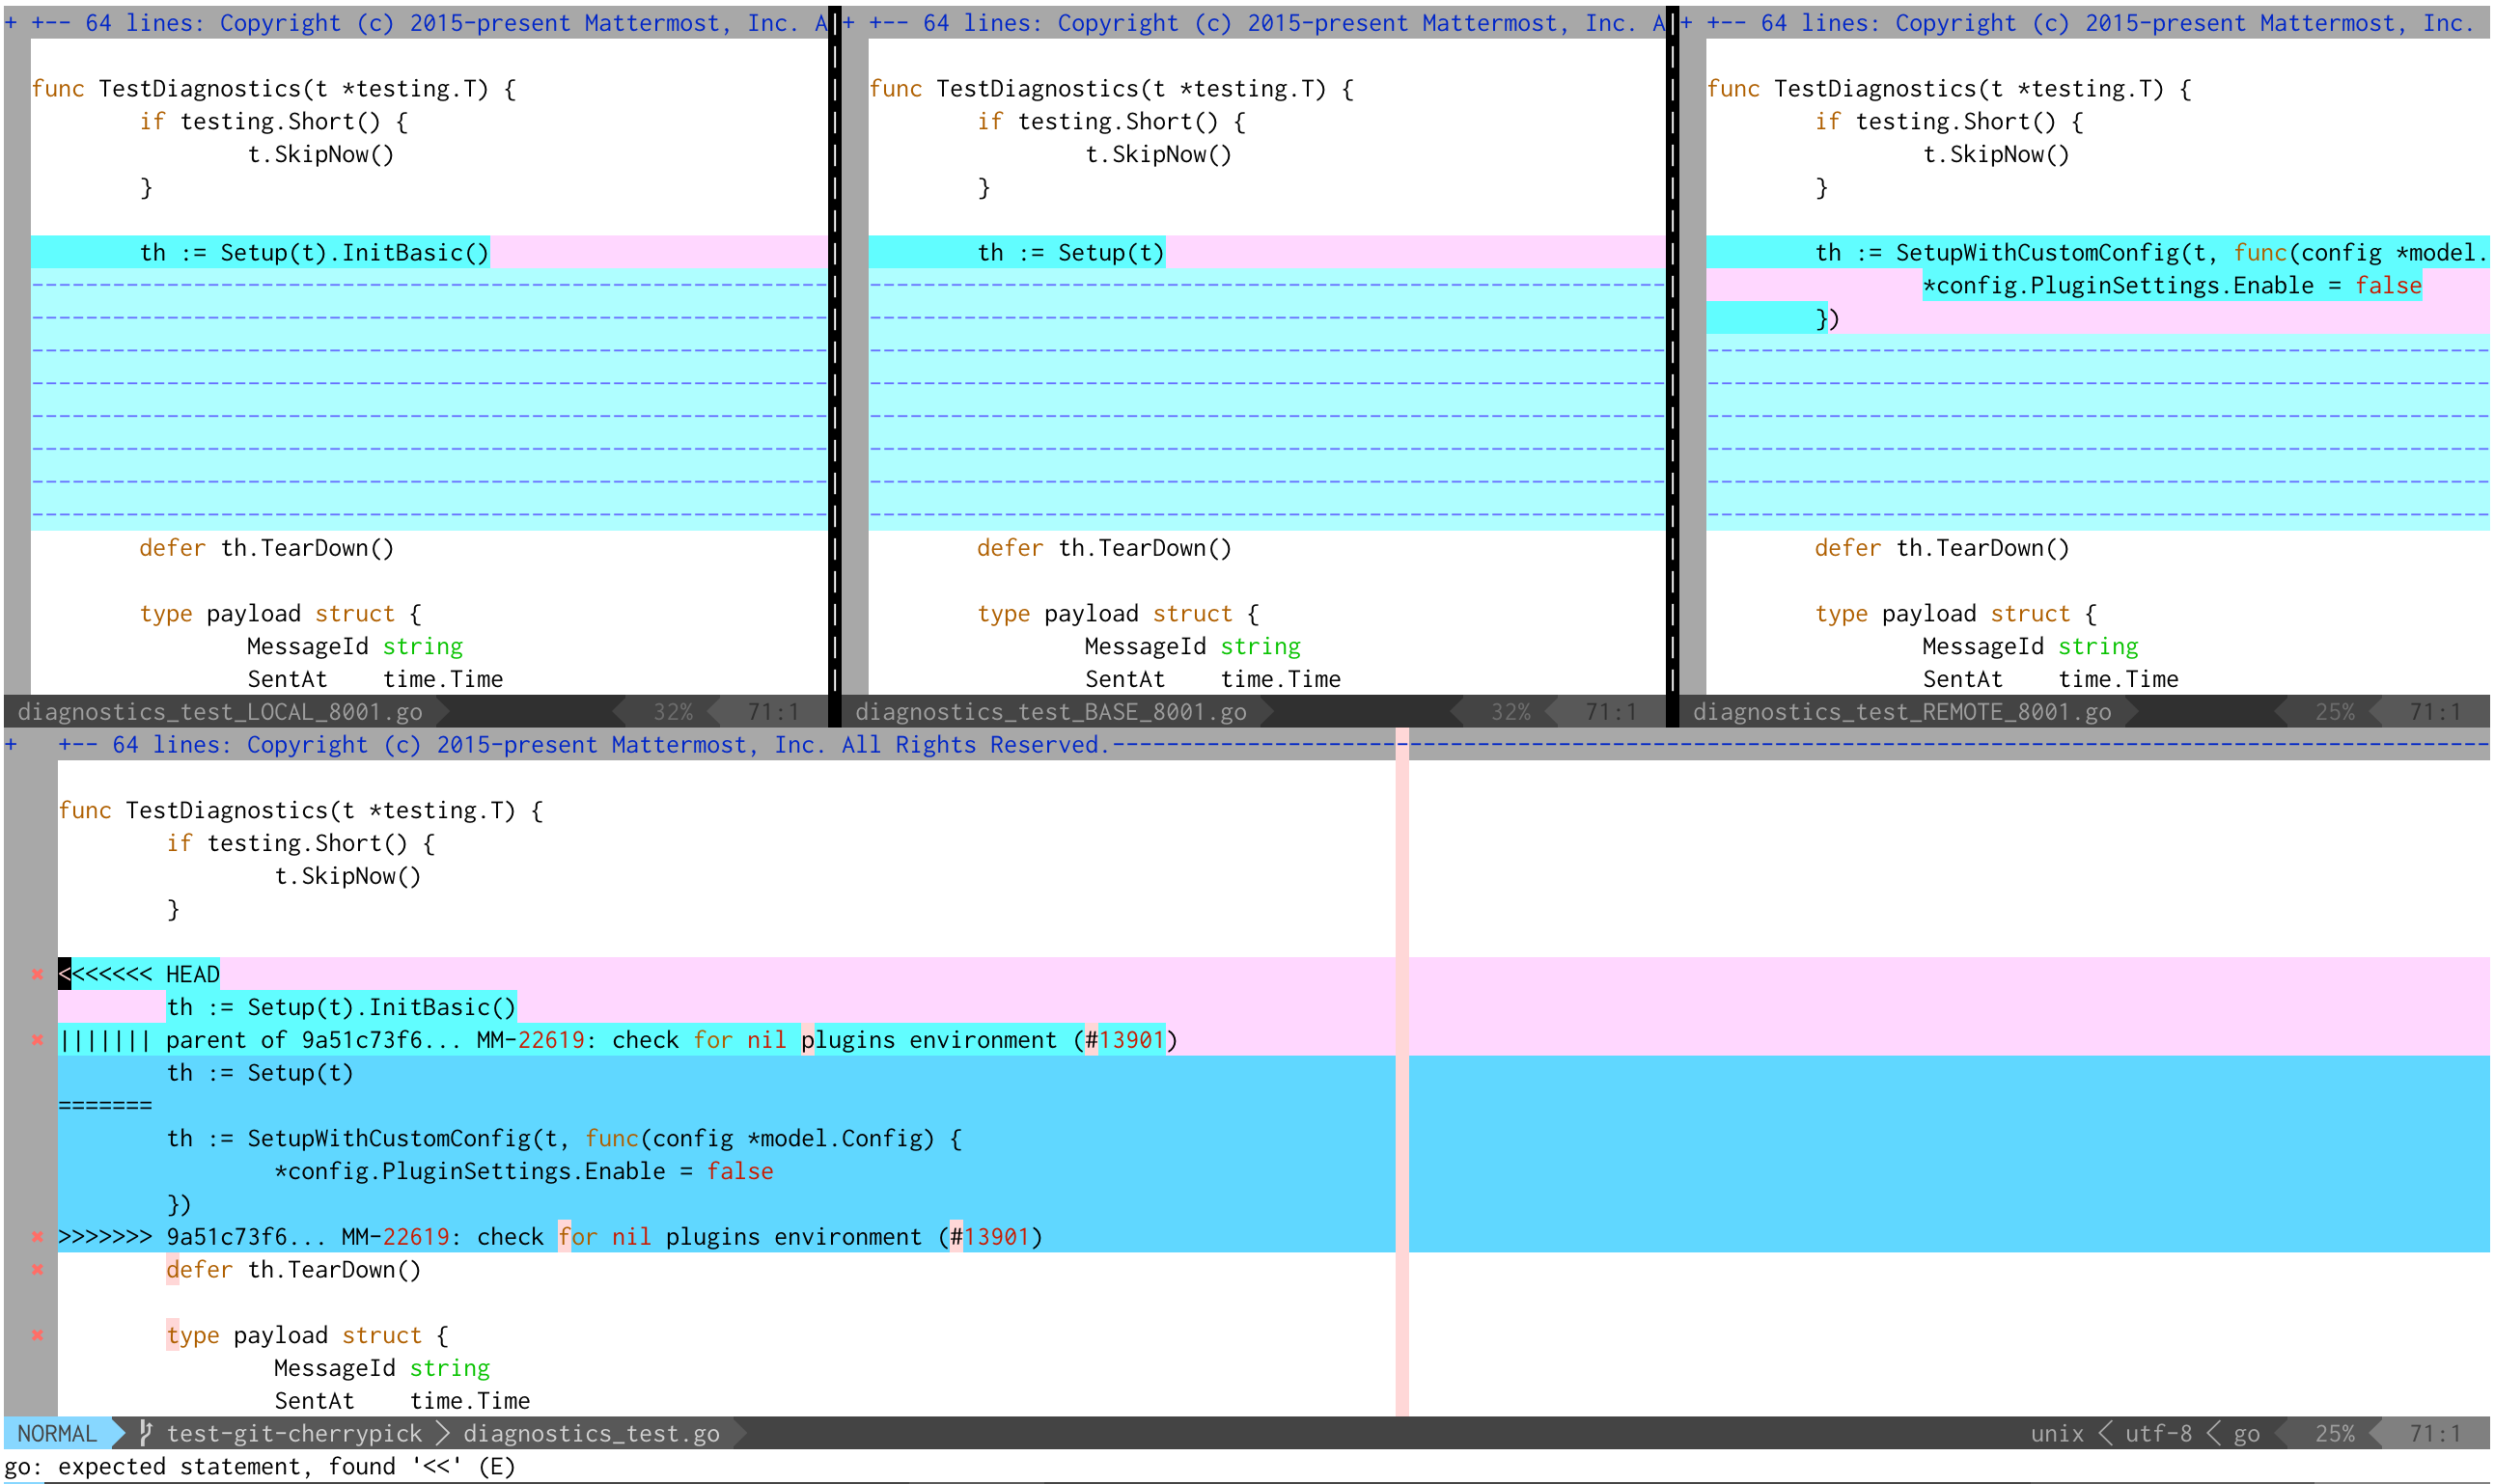
The middle pane shows the common ancestor. On its left is what’s in the current branch, and on the right is what’s incoming. The bottom pane is the current file, showing the conflict markers. In general with merge conflicts, you have to understand the context of the code you are changing in order to make the decision on what version to keep, or whether to blend the changes somehow. In this case, I happen to know that a colleague of mine removed a redundant call to InitBasic in the master branch as part of a cleanup effort, but those clean up changes aren’t in this release branch. So I need to combine the two changes together and put the call to InitBasic on top of the my original code. Then I’ll get rid of the other sections and the conflict markers.
With the conflicts resolved, I’m good to finish the cherry-pick!
git cherry-pick --continue
I’ve created a new commit that contains the changes from another branch, and would now be ready to push up this branch for review and CI testing before merging it into the release branch.
The conflict resolution I just performed might have just as easily happened when doing a git revert. The process would be the same, and the hard part shouldn’t be the tool you are using, but knowing the context of the code you are changing so you can make the right decisions.
My all time favorite Git command is git rebase! Long before I learned Git, I used a version control system called Perforce. It was undoubtedly powerful for its time, but I found it intensely frustrating to organize my code changes for review. Let me describe my typical workflow:
git checkout feature-branch
vim ...
git commit -m 'wip'
vim ...
git commit -m 'wip'
...
This technique is known as “commit early and often”. Every now and then, I’ll also push my feature branch upstream (without opening a pull request) just to save my changes in case my computer dies. This is a perfectly fine way to develop, but it makes for very poor pull requests. You can read my thoughts on Submitting Great PRs, but the summary is that the best pull requests consist of a sequence of logically ordered commits that break up the changes into easy to follow chunks.
Let me walk you through an example. We’re going to see about improving some code coverage for the model package:
# Checkout the mattermost-server repository (if not already done)
git clone https://github.com/mattermost/mattermost.git
cd mattermost-server

git checkout -b test-git-rebase
cd model
go test ./... -coverprofile=coverage.out && go tool cover -html=coverage.out -o coverage.html && open coverage.html
Let’s take a look at the coverage of model/config.go:
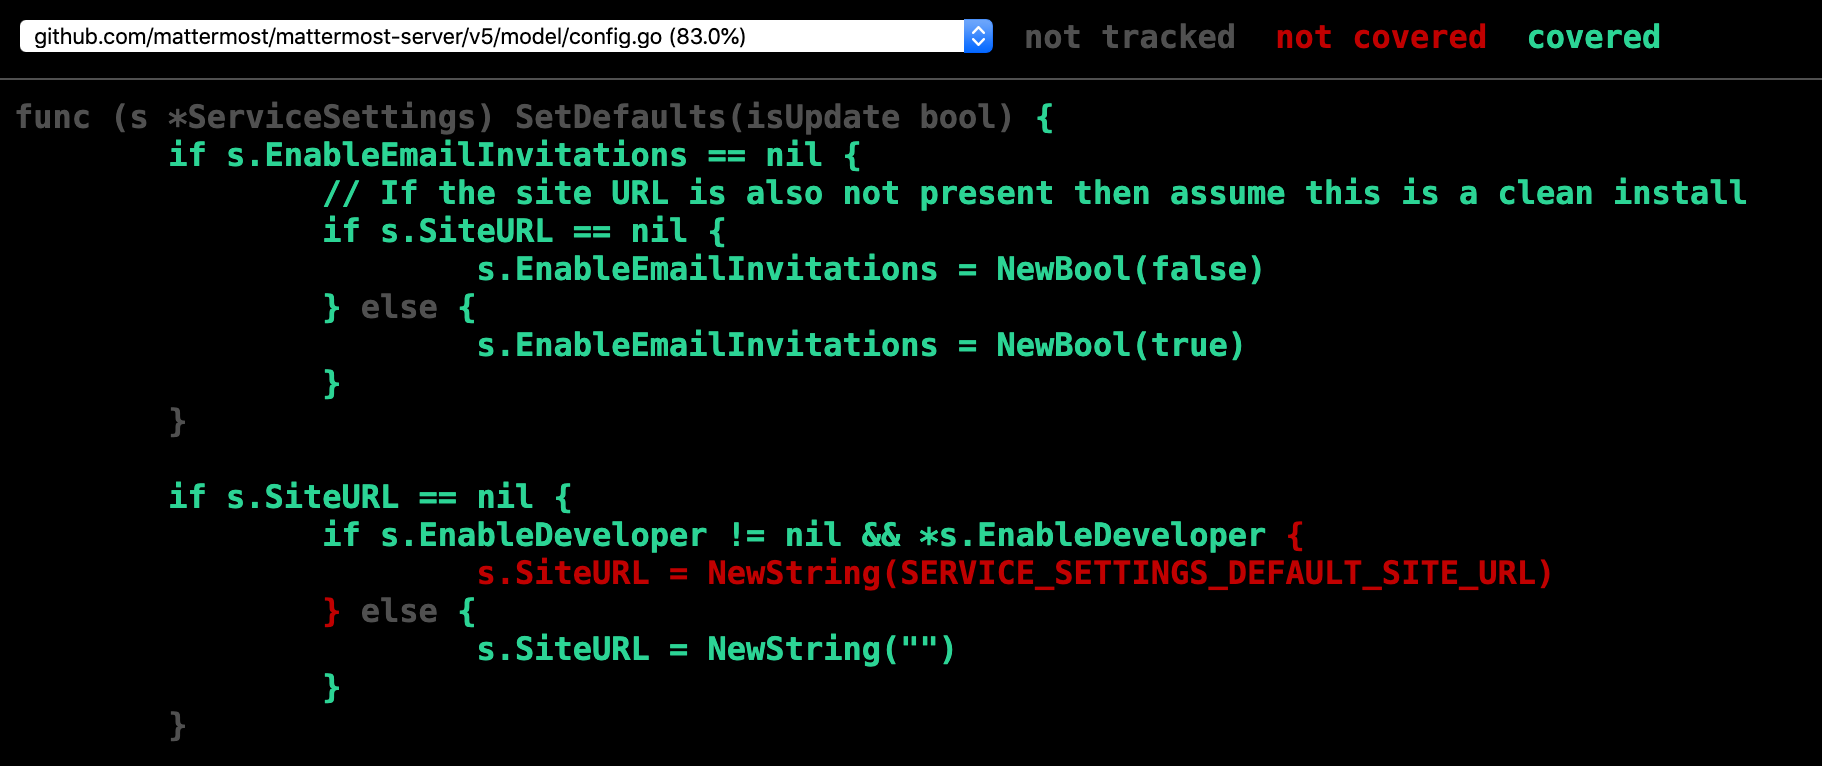
Ah, it appears we aren’t explicitly adding a test to verify that the SiteURL is initialized differently when EnableDeveloper is true. Let’s add that now.
func TestConfigEnableDeveloper(t *testing.T) {
	c1 := Config{
		ServiceSettings: ServiceSettings{
			EnableDeveloper: NewBool(true),
		},
	}
	c1.SetDefaults()

	require.Equal(t, SERVICE_SETTINGS_DEFAULT_SITE_URL, *c1.ServiceSettings.SiteURL)
}
Commit that and run the tests again:
git add model/config.go
git commit -m 'add TestConfigEnableDeveloper'
go test ./... -coverprofile=coverage.out && go tool cover -html=coverage.out -o coverage.html && open coverage.html
and examine the coverage:
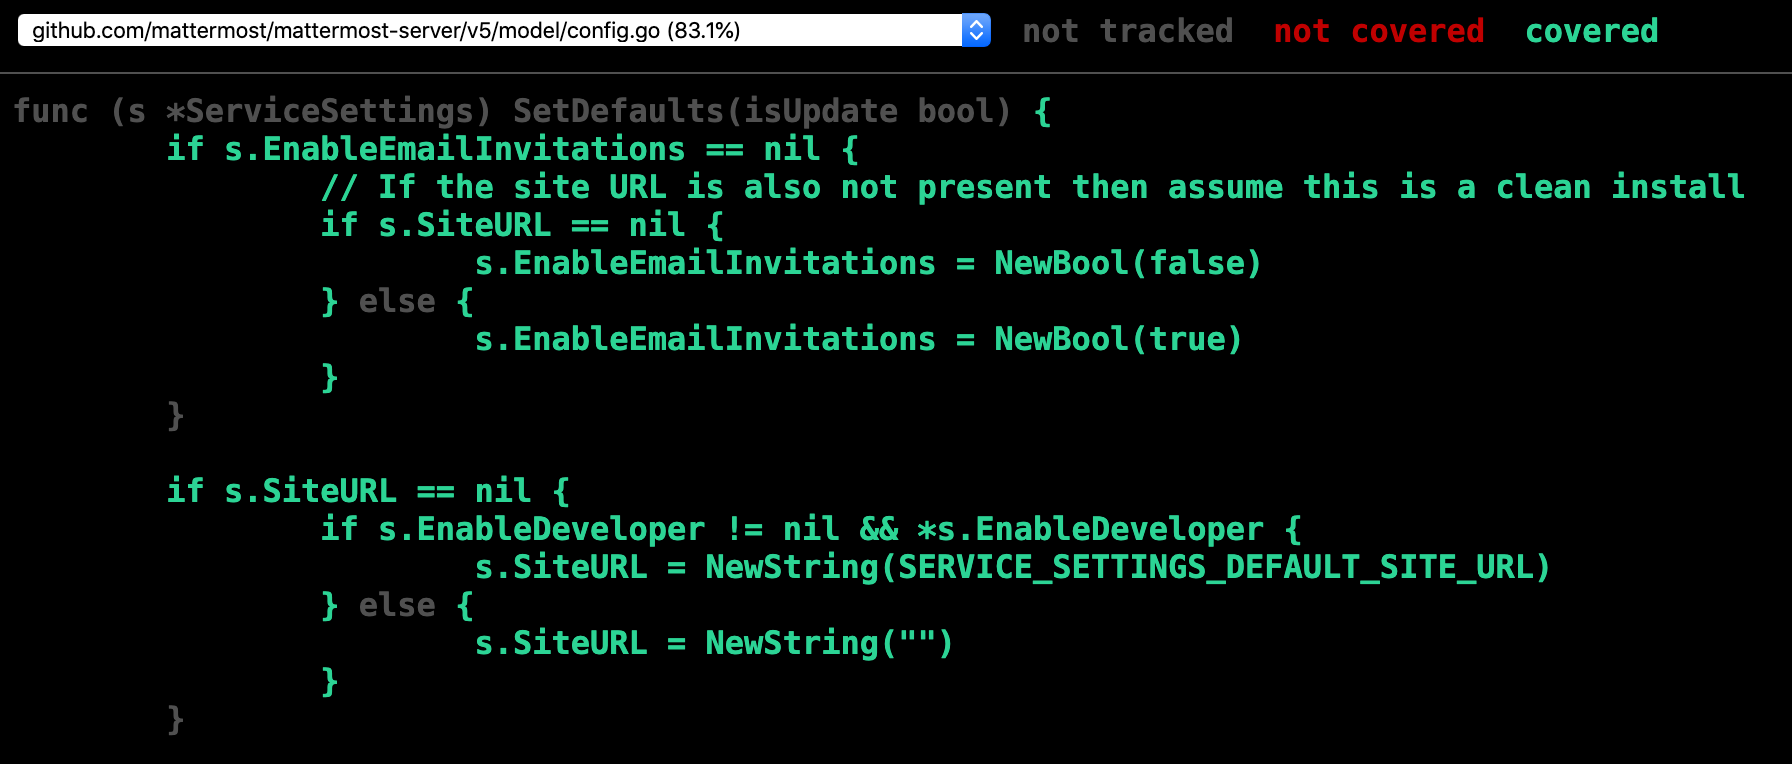
Looks better! But I’m not super happy with the way that test was written, since I’m only explicitly testing one case. Let’s test all three cases with sub tests.
func TestConfigEnableDeveloper(t *testing.T) {
	t.Run("empty site URL when nil", func(t *testing.T) {
		c1 := Config{
			ServiceSettings: ServiceSettings{
				EnableDeveloper: nil,
			},
		}
		c1.SetDefaults()

		require.Empty(t, *c1.ServiceSettings.SiteURL)
	})

	t.Run("empty site URL when false", func(t *testing.T) {
		c1 := Config{
			ServiceSettings: ServiceSettings{
				EnableDeveloper: NewBool(false),
			},
		}
		c1.SetDefaults()

		require.Empty(t, *c1.ServiceSettings.SiteURL)
	})

	t.Run("default site URL when true", func(t *testing.T) {
		c1 := Config{
			ServiceSettings: ServiceSettings{
				EnableDeveloper: NewBool(true),
			},
		}
		c1.SetDefaults()

		require.Equal(t, SERVICE_SETTINGS_DEFAULT_SITE_URL, *c1.ServiceSettings.SiteURL)
	})
}
Ok, save that and check again.
git add model/config.go
git commit -m 'improve testing coe'
go test ./... -coverprofile=coverage.out && go tool cover -html=coverage.out -o coverage.html && open coverage.html
Same coverage, but the tests are better structured. Let’s see what else we can fix! Hmm, something’s not right with EnableIncomingWebhooks:
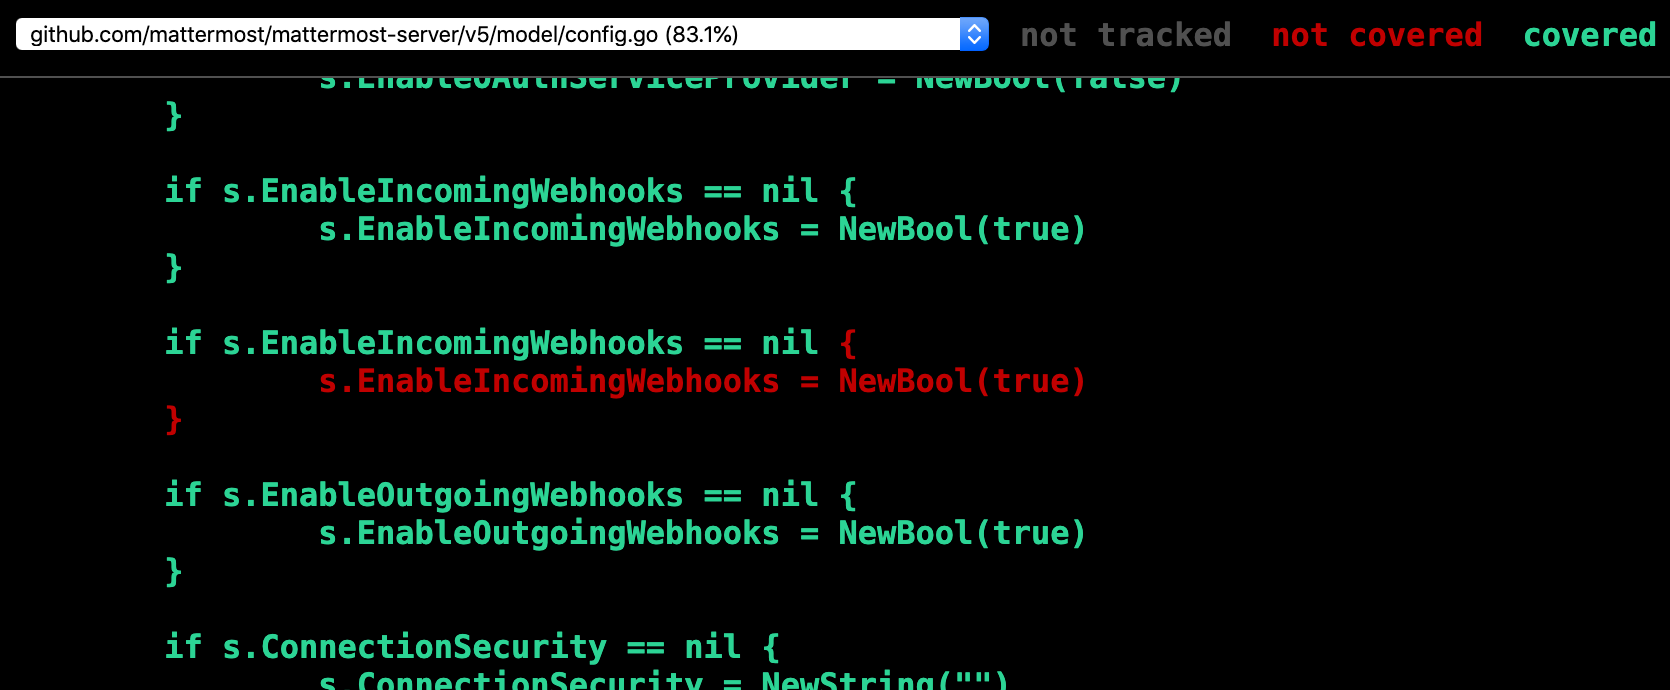
Ah, it looks like we’ve duplicated the initialization code, so there’s no way this second block can ever run! Let’s remove those lines and save again.
git add model/config.go
git commit -m 'remove dead code'
go test ./... -coverprofile=coverage.out && go tool cover -html=coverage.out -o coverage.html && open coverage.html

Excellent! But, you know, I’m not really happy with the tests I wrote earlier. There’s a lot of duplicate code, and it’s really hard to understand what’s going on. Let’s rewrite those tests as cases instead.
func TestConfigEnableDeveloper(t *testing.T) {
	testCases := []struct {
		Description     string
		EnableDeveloper *bool
		ExpectedSiteURL string
	}{
		{"empty site URL when nil", nil, ""},
		{"empty site URL when false", NewBool(false), ""},
		{"default site URL when true", NewBool(true), SERVICE_SETTINGS_DEFAULT_SITE_URL},
	}

	for _, testCase := range testCases {
		t.Run(testCase.Description, func(t *testing.T) {
			c1 := Config{
				ServiceSettings: ServiceSettings{
					EnableDeveloper: testCase.EnableDeveloper,
				},
			}
			c1.SetDefaults()

			require.Equal(t, testCase.ExpectedSiteURL, *c1.ServiceSettings.SiteURL)
		})
	}
}
git add model/config.go
git commit -m 'wip'
go test ./... -coverprofile=coverage.out && go tool cover -html=coverage.out -o coverage.html && open coverage.html
Excellent! Now let’s look at the commit history:
git log -p
commit 3489625af31bdf825f615e1963220c0857d7ca31 (HEAD -> test-git-rebase)
Author: Jesse Hallam
Date:   Mon Mar 16 11:31:05 2020 -0300

    wip

commit f1ef494d443099ebbbb719286ddef2eb8a80168e
Author: Jesse Hallam
Date:   Mon Mar 16 11:26:09 2020 -0300

    remove dead code

commit b57fde46986f27197696e72e93493a98896baaea
Author: Jesse Hallam
Date:   Mon Mar 16 11:27:37 2020 -0300

    improve testing coe

commit da0d04f00b9b11b10969a3467f88d109abc0ab9b
Author: Jesse Hallam
Date:   Mon Mar 16 11:24:53 2020 -0300

    add TestConfigEnableDeveloper
So the final diff is great, but the commits themselves are pretty disorganized. That’s not how I want to present my work to my team. Imagine if these were dozens of commits over hundreds of changes. Imagine if I decided to rename a variable used all over the code halfway through my changes. It’s pretty hard to review a set of disorganized changes so, git rebase to the rescue! Let’s run it interactively:
git rebase -i origin/master
It’s thrown me into an editor, with each of my commits as a separate line. By default, they are all (cherry) “picked” to be kept, but I have a number of options to help me reorganize my code. So the first two commits and the last commit really don’t need to be separated at all: they should just be a single commit. I’m going to move the last line up above the third commit, and then tell git rebase to squash the two commits into the first commit:
pick … (Jesse Hallam) add TestConfigEnableDeveloper
squash … (Jesse Hallam) improve testing coe
squash … (Jesse Hallam) wip
pick  … (Jesse Hallam) remove dead code
When I save and exit this file, Git will create a temporary ref at origin/master, and cherry-pick the changes in the order I requested. When I tell it to squash, commit amends to the previous commit, effectively squashing the three commits together. Save and exit, and you’ll see I’m being prompted to write a new commit history for the squash commits. Finally, let’s look at the diff:
git log -p
Much better! Except, the messages are still pretty disorganized. Let’s fix that with another rebase, but we’ll reword the messages this time:
git rebase -i origin/master
reword … (Jesse Hallam) add TestConfigEnableDeveloper
pick  … (Jesse Hallam) remove dead code
Neat! Of course, I didn’t have to do this in two passes, but I wanted to show you that you can run it as often as necessary. Sometimes, when you reorder your commits, you’ll end up with merge conflicts. Just as with git cherry-pick and git revert, git rebase will stop and ask you to resolve the conflicts. Then you can --continue and it will pick up with the next commit.
There’s a lot more that git rebase can do – for example, if I delete a line during an interactive rebase, that commit is dropped altogether. Let’s try that now:
git rebase -i origin/master
pick … (Jesse Hallam) add TestConfigEnableDeveloper
Great! But… wait, I just deleted the commit! Oh no, my work is gone … not exactly!
git reflog to the rescue! What is the reflog? https://git-scm.com/docs/git-reflog explains:
Reference logs, or ‘reflogs’, record when the tips of branches and other references were updated in the local repository.
In layman terms, think of this way: Git remembers every commit you make, even if they aren’t reachable by your named branches. Let’s take a look at the reflog for HEAD:
git reflog
bd8501963 (HEAD -> test-git-rebase) HEAD@{0}: rebase -i (finish): returning to refs/heads/test-git-rebase
bd8501963 (HEAD -> test-git-rebase) HEAD@{1}: rebase -i (start): checkout origin/master
353db22f6 HEAD@{2}: rebase -i (finish): returning to refs/heads/test-git-rebase
353db22f6 HEAD@{3}: rebase -i (pick): remove dead code
bd8501963 (HEAD -> test-git-rebase) HEAD@{4}: rebase -i (reword): add TestConfigEnableDeveloper
e9d6796e8 HEAD@{5}: rebase -i: fast-forward
1c498996a (origin/master, origin/HEAD, master) HEAD@{6}: rebase -i (start): checkout origin/master
9ee8564a3 HEAD@{7}: rebase -i (finish): returning to refs/heads/test-git-rebase
9ee8564a3 HEAD@{8}: rebase -i (pick): remove dead code
e9d6796e8 HEAD@{9}: rebase -i (squash): add TestConfigEnableDeveloper
4fe98edfa HEAD@{10}: rebase -i (squash): # This is a combination of 2 commits.
da0d04f00 HEAD@{11}: rebase -i (start): checkout origin/master
3489625af HEAD@{12}: rebase -i (finish): returning to refs/heads/test-git-rebase
3489625af HEAD@{13}: rebase -i (pick): wip
f1ef494d4 HEAD@{14}: rebase -i (pick): remove dead code
b57fde469 HEAD@{15}: rebase -i (pick): improve testing coe
da0d04f00 HEAD@{16}: rebase -i (pick): add TestConfigEnableDeveloper
1c498996a (origin/master, origin/HEAD, master) HEAD@{17}: rebase -i (start): checkout origin/master
You can see the rebase we just did, and the rebase before that, and the rebase before that. If I run the command again with another flag, I can see the time when these references changed:
git reflog --date=iso
bd8501963 (HEAD -> test-git-rebase) HEAD@{2020-03-16 18:01:49 -0300}: rebase -i (finish): returning to refs/heads/test-git-rebase
bd8501963 (HEAD -> test-git-rebase) HEAD@{2020-03-16 18:01:49 -0300}: rebase -i (start): checkout origin/master
353db22f6 HEAD@{2020-03-16 18:01:45 -0300}: rebase -i (finish): returning to refs/heads/test-git-rebase
353db22f6 HEAD@{2020-03-16 18:01:45 -0300}: rebase -i (pick): remove dead code
bd8501963 (HEAD -> test-git-rebase) HEAD@{2020-03-16 18:01:43 -0300}: rebase -i (reword): add TestConfigEnableDeveloper
e9d6796e8 HEAD@{2020-03-16 18:01:43 -0300}: rebase -i: fast-forward
1c498996a (origin/master, origin/HEAD, master) HEAD@{2020-03-16 18:01:43 -0300}: rebase -i (start): checkout origin/master
9ee8564a3 HEAD@{2020-03-16 18:01:37 -0300}: rebase -i (finish): returning to refs/heads/test-git-rebase
9ee8564a3 HEAD@{2020-03-16 18:01:37 -0300}: rebase -i (pick): remove dead code
e9d6796e8 HEAD@{2020-03-16 18:01:35 -0300}: rebase -i (squash): add TestConfigEnableDeveloper
4fe98edfa HEAD@{2020-03-16 18:01:35 -0300}: rebase -i (squash): # This is a combination of 2 commits.
da0d04f00 HEAD@{2020-03-16 18:01:35 -0300}: rebase -i (start): checkout origin/master
3489625af HEAD@{2020-03-16 17:53:19 -0300}: rebase -i (finish): returning to refs/heads/test-git-rebase
3489625af HEAD@{2020-03-16 17:53:19 -0300}: rebase -i (pick): wip
f1ef494d4 HEAD@{2020-03-16 17:53:19 -0300}: rebase -i (pick): remove dead code
b57fde469 HEAD@{2020-03-16 17:53:19 -0300}: rebase -i (pick): improve testing coe
da0d04f00 HEAD@{2020-03-16 17:53:19 -0300}: rebase -i (pick): add TestConfigEnableDeveloper
1c498996a (origin/master, origin/HEAD, master) HEAD@{2020-03-16 17:53:19 -0300}: rebase -i (start): checkout origin/master
And there’s my missing commit reference! I can git show f1ef494d4 it to confirm, and then bring it back into my branch with a simple git cherry-pick f1ef494d4.
I presented git reflog last, since I think it’s one of the harder commands to fundamentally understand: but this is probably the one command you should learn first, because you recover from almost any mistake you make with Git using the reflog.
There’s a ton more one could say about these commands, and even other advanced Git commands. My hope is that you won’t give up if you find Git intimidating, especially when you know you can rely on the reflog to experiment without fear.